Raspberry Pi: Set up an FTP server under Debian with ProFTPd
In the following tutorial we will install an FTP server on the Raspberry Pi and set up a user for it. My tutorial actually works, unlike other tutorials, because my tutorials are live tested and not just blindly written.
Part 1: Install and set up FTP server
First we install ProFTPd as FTP server
apt-get install proftpdAfter that we get an ID which we remember for later on
id www-dataWe open the configuration
nano /etc/proftpd/proftpd.confand extend it at the end with the following code:
DefaultRoot ~
AuthOrder mod_auth_file.c mod_auth_unix.c
AuthUserFile /etc/proftpd/ftpd.passwd
AuthPAM off
RequireValidShell off
We save the file with Ctrl + X and create a directory
mkdir /home/ftpuser
chmod 775 /home/ftpuser
chown -R www-data:www-data /home/ftpuser
and change to the ProFTPd directory
cd /etc/proftpd/In the following command the ID determined above will be required again, here in the example as ID 33
ftpasswd --passwd --name ftpuser --uid 33 --gid 33 --home /home/ftpuser --shell /bin/falseImportant: If the hostname is not set, an error will occur, therefore we set a hostname
Tip: To delete just add “–delete-user” in front.
hostnamectl set-hostname debianNow we restart the FTPd server
/etc/init.d/proftpd restartPart 2: Raspberry Pi FTP server with USB hard drive
You want to set up a Raspberry Pi FTP server with a USB hard disk? Then the following part of my tutorial might help you. First you have to connect the USB harddisk, then you can set the name of the harddisk with
fdisk -lcan be read out. In our example the USB hard disk is /dev/sda1. In the following example we create a new partition table with fdisk on the harddisk
fdisk /dev/sda1
g
n
1
ENTER
ENTER
w
and submit the changes to the kernel
partx /dev/sda1then we can create a file system
mke2fs -j /dev/sda1We now mount the disk to the path of the previously created directory
mount -v -o rw /dev/sda1 /home/ftpuserTo be on the safe side we set the appropriate file permissions again
chmod 775 /home/ftpuser
chown -R www-data:www-data /home/ftpuser
And extend the boot table with
nano /etc/fstab/with the following content
/dev/sda1 /home/ftpuser auto rw 0 0Finally we restart the FTPd
/etc/init.d/proftpd restartPart 3: Own service for autostart or automount
An alternative to the boot table would be an own service as shellscript. The advantage of this is that the boot process is not interrupted unnecessarily in case of errors.
For this we change into the Systemd directory:
cd /etc/systemd/systemand create a new simple service with nano
nano automountusb.serviceHere we enter all details of our shellscript
[Unit]
Description=Automount USB by lautenbacher.ch

[Service]
Type=simple
ExecStart=/bin/bash /home/automount.sh

[Install]
WantedBy=multi-user.target
Then we generate our shell script with nano
nano /home/automount.shand the following content
mount -v -o rw /dev/sda1 /home/ftpuser
chmod 775 /home/ftpuser
chown -R www-data:www-data /home/ftpuser
We make the shell script executable
chmod 775 /home/automount.shand enable the newly created service
systemctl enable automountusb.serviceAfter a reboot with
rebootthe output per
dfshould show that /dev/sda1/ is mounted to the path /home/ftpuser/:
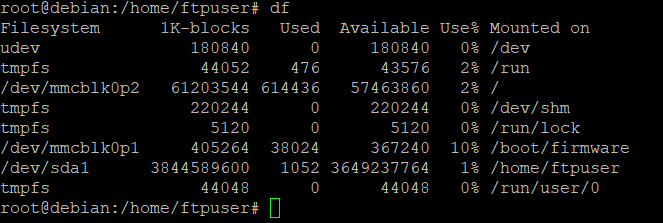
Part 4: TLS/SSL Encryption
First, two new packages need to be installed
apt-get install ssl-cert
apt-get install proftpd-mod-crypto
After that we generate the certificate:
make-ssl-cert generate-default-snakeoil -force-overwriteand change the modules.conf by removing the comment (#) from the “mod_tls” module
nano /etc/proftpd/modules.confthen we create a custom configuration
nano /etc/proftpd/conf.d/proftp-custom.confunder store the following content:
    RequireValidShell off

# Default directory is ftpusers home
DefaultRoot ~ ftpuser
# Limit login to the ftpuser group

    DenyGroup !ftpuser


        TLSEngine on
        TLSLog /var/log/proftpd/tls.log
        TLSProtocol TLSv1
        TLSRSACertificateFile /etc/ssl/certs/ssl-cert-snakeoil.pem
        TLSRSACertificateKeyFile /etc/ssl/private/ssl-cert-snakeoil.key
        TLSVerifyClient off
        TLSRequired on
TLSOptions NoSessionReuseRequired
After that we change to the ProFTPd directory
cd /etc/proftpdand create a new system user (note that this differs from the above)
adduser ftpuser -shell /bin/false -home /home/ftpuserSince the uid and gid changed by creating a system user we have to assume corresponding adjustments here as well, so we change the password configuration of ProFTPd as well (again):
ftpasswd --passwd --name ftpuser --uid 1000 --gid 1000 --home /home/ftpuser --shell /bin/falseOf course, the owner must then be changed as well
chown ftpuser:ftpuser /home/ftpuserand then restart the service
/etc/init.d/proftpd restartIf you have set up the automount service above you have to change the shellscript accordingly (remove “-R” for part 5)
nano /home/automount.shPart 5: Create subaccounts
The code below should speak for itself, the only important thing here is that the new user is assigned to the group ftpuser.
cd /etc/proftpd
mkdir /home/ftpuser/ftpusera
adduser ftpusera -shell /bin/false -home /home/ftpuser/ftpusera
ftpasswd --passwd --name ftpusera --uid 1001 --gid 1000 --home /home/ftpuser/ftpusera --shell /bin/false
chown -R ftpusera:ftpuser /home/ftpuser/ftpusera
usermod -a -G ftpuser ftpusera
/etc/init.d/proftpd restart
Part 6: Other settings / Passive ports
In order to make the FTP(S) server reachable from the outside, some settings regarding the passive ports and IP have to be made. Otherwise we get e.g. the error message “unroutable address” or the directory content can not be read.
First we create a new configuration file
nano /etc/proftpd/passive.confwith the following content:
PassivePorts 49152 65535
We then execute the following commands
/sbin/modprobe nf_conntrack_ftp
/sbin/modprobe nf_nat_ftp
echo nf_nat_ftp >> /etc/modules-load.d/modules.conf
echo nf_conntrack_ftp >> /etc/modules-load.d/modules.conf
To be on the safe side we also change the original configuration file again
nano /etc/proftpd/proftpd.confHere we enter the public IP address as DefaultAddress and – often forgotten – as Masquerade Address. Additionally we enter the passive ports here.
DefaultAddress 1.1.1.1
MasqueradeAddress 1.1.1.1
PassivePorts 49152 65535
After that we restart the service and can check the NAT settings with the last command.
service proftpd restart
lsmod | grep nf_nat_ftp
After these settings the FTPS server is reachable cleanly even behind an iptables firewall.