Enlarge partition under Debian/Linux and extend hard disk under VirtualBox
Today’s article is about the extension of partitions under Linux or Debian. Since most of you probably also use a corresponding VirtualBox, I would like to explain how the entire hard disk can be enlarged under VirtualBox.
All this seems to complicated? I will be happy to help you at reasonable hourly rates – just write to me via my contact form.
Enlarge virtual hard disk under VirtualBox
First you should switch off the virtual machine and then make a backup of the virtual hard disk. Then find the path of the virtual hard disk and start cmd as administrator. After that you can use the VBoxManage.exe to give the command modifyhd with the path and the desired size in MB (resize). The command looks like this
C:\Programs\Oracle\VirtualBox\VBoxManage.exe" modifyhd "C:\Users\Administrator\VirtualBox VMs\Webserver\Webserver.vdi" --resize 300000The output should look like the following:

This already completes the resizing of the virtual disk.
Increase partition size under Linux/Debian
If you have enlarged your virtual hard disk like in the example above, still have free space left or have cloned the partitions to a larger hard disk, you still have to modify the corresponding partition tables under Linux.
For this we have to make some deep changes, but don’t worry the data is usually preserved.
In my example I assume that it is sda1 as primary partition and sda5 as swap partition.
We first turn off the swap under Linux with the following command:
swapoff /dev/sda5Then we start fdisk with
fdisk /dev/sdaand let us copy all partitions with
pto display all partitions.
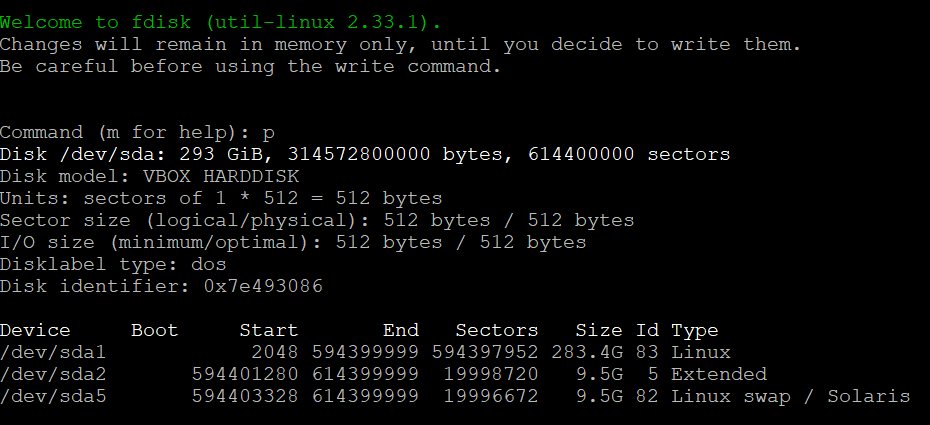

Here we see sda1 as primary partition and the sda5 swap under the extended partition sda2. We especially note the start sector of sda1 (where our important data is).
Then we delete all partitions with
dHere you will be asked for the partition number (1, 2, 5). This process has to be repeated until all partitions are deleted.
After that you first create sda1 with
nagain. You will be asked for the start sector and end sector, the start sector should be the same as the start sector from before (usually 2048). This is a primary partition. 20.000.000 sectors correspond to about 10 GB
Please do not forget to leave some space for the swap partition.
Important: If an existing signature is detected it must not be deleted. The correct answer is therefore “n/no/no”.
After creating sda1, use the same command (“n”) to create sda2 as an extended partition.
Afterwards you create the logical partition sda5, also simply with (“n”)
For sda5 you have to change the type. Therefore you enter
tand select the partition 5. You will be asked for the correct hex code, which is
82for swap partitions under Linux/Debian.
Afterwards we save all changes in fdisk with
w
q
To tell the kernel about the changes faster we have to use the command
partx /dev/sdamust be executed. After this the size of the file system can be adjusted to sda1. This can be done with the command
resize2fs /dev/sda1The size is specified in MB, e.g. as “280000M”.
Next, it is essential to change the boot table before rebooting. For this we open /etc/fstab with the text editor nano
nano /etc/fstab/Here we replace the UUID with /dev/sda5


The change can be saved with Ctrl+ X (close and save on demand).
After that we restart the server with
rebootAfter reboot we finally change sda5 to a swap partition and turn on swap.
mkswap /dev/sda5
swapon /dev/sda5
To avoid errors later we determine the UUID again with the command
blkidWe now enter the UUID for sda5 under /etc/fstab/ instead of “/dev/sda5” again
nano /etc/fstab/Close and save nano with Ctrl + X. Afterwards we restart the server to avoid later errors and check if the swap is active with the command
swapon --showIf all steps were followed correctly, an active swap should be displayed like here:

